These paper flowers are not only easy to make, the watercolor edges add a pretty touch. These flowers can be used to make a wreath, bouquet, or topiary, use your imagination. I used mine to make
I first ran across this water color technique years ago at cub scout day camp. They did this technique a little differently to demonstrate the colors in rainbows. I tucked the idea away in my brain and years later came up with turning them into paper flowers.
Here's how you do it.
Supplies:
Washable Markers
Coffee Filters (3 per flower)
clear tape
bowl/water
paper towels
Directions:
Open up a coffee filter, and then fold it in half, smoothing it out flat.
Using the desired color of washable marker, fill in the edges of both sides of the filter. (Make the stripe of color as wide as you'd like). You'll need 3 filters for each flower.
Jan's tips: My favorite one to use is the brown marker, because it is made up of many colors. When the water hits it, the colors start to come out. See the center flower in the wreath picture above. That was a brown fine tipped washable marker and you can see how the red came out and mixed with the brown to make a pretty color. Red softens to a pretty pink. Play with a few filters and see what the colors do! Your kids will love it! (Let them color rings alot closer to the center of the filter in different colors right next to each other (think a complete circle rainbow) and see what happens!
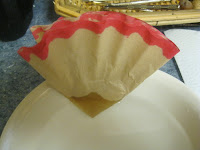
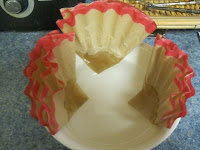
Fill a cereal bowl 1/3 way with water. Place the tip end of each filter triangle into the water. Hold the filter until it has absorbed enough water that you can gently press it to the side of the bowl and it will stay there with out sliding down into the bowl. Repeat process with other two triangles so all three triangles are in the bowl of water.
Water will continue to absorb up the filters, till it reaches the very top of the filter. You will see the color from the marker started to soften, run a little creating the water color effect as the water is absorbed through the filter.

When all of the filters have been absorbed water to the top of the filter, remove filters from the bowl of water and lay flat on paper towels to dry. (The color will run still, so you need the paper towels). You can leave them folded to dry, or if you have enough room you can open them up to dry. It will take several hours to dry. I've never tried a blow dryer, but wonder if that would work to speed the drying process.
Once filters are dry, you can begin to make the flowers.
Stack 3 coffee filters together.
Fold the filters in half to make one half circle.
Fold the half circle in half to make a triangle.
Fold triangle in half to make an even smaller triangle.
Slightly twist the pointed tip end of the triangle to make a stem and secure with a piece of clear tape.
Now gently start opening up the colored edged layers to create the petals of the flower. Keep playing around with opening up the flower till you like it.
I have found that when you start opening it up, you will see that because of the folds in the filter it will at first have two sections, almost look like a heart. To round that out, find the top of the two separate sections and discreetly place a small piece of clear tape or a small dot of hot glue to hold the two sides together. This will help you round out your flower a bit more. See below for how I did mine.
Separate the layers to find the two sections.
Hold the two edges together.
Discreetly put a dot of hot glue or a small piece of tape on the outside of the flower to pull the two sections together. Continue shaping flower till done.
Featured at:

http://linda-coastalcharm.blogspot.com/
http://www.atthepicketfence.com/2012/01/inspiration-friday-no-47.html
http://commonground-debrasvintagedesigns.blogspot.com/2012/01/vintage-inspiration-friday-72-antique.html
http://chiconashoestringdecorating.blogspot.com/2012/01/flaunt-it-friday-87-and-my-thoughts-on.html
http://joyfulstamper.blogspot.com/search/label/Inspire%20Me%20Fridays
http://www.bedifferentactnormal.com/2012/01/show-and-tell-saturday-011411.html
http://funkyjunkinteriors.blogspot.com/
http://herestohandyandy.blogspot.com/2012/01/pinteresting-link-party-week-22.html
http://craftomaniac.blogspot.com/
http://www.thegirlcreative.com/
http://www.theprairiehomestead.com/2012/01/homestead-barn-hop-45.html
http://some-good-times.blogspot.com/
http://www.skiptomylou.org/2012/01/16/made-by-you-monday-83/
http://www.madincrafts.com/2012/01/mad-skills-party-86.html
http://projectqueen.org/
http://www.oopseydaisyblog.com/
http://asouthernladysramblings.blogspot.com/2012/01/pinterest-love-and-thursday-link-party.html


