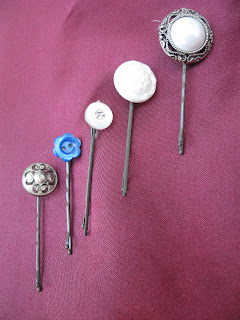
You can use regular bobby pins or look at your local craft or fabric store for these bobby pin blanks:
After going to two stores and not finding the blanks, I refused to use any more gas and used regular bobby pins I had at home. Regular bobby pins are a bit harder to use, but for me was way cheaper than going all over town or paying shipping to order them. Next time your out running to the craft or fabric store just put a package of these on your shopping list to keep handy for those last minute gifts that pop up!
So I found that if you use a button with a shank on the back, it's easier to thread the bobby pin through the shank and then turn it over and hot glue the back of the shank to the bobby pin:
 |
| a little too much hot glue here, had to clean this one up a bit! |
Now since I was using regular bobby pins, after the glue had set, I did need to go back and make sure that the glue didn't glue together both pieces of the bobby pin. I gently opened the bobby pin till the glue released from the front of the bobby pin.
If you want to make another fun version of these, you can make them into yo-yo button bobby pins. These are the perfect assessory to any little girls hair! The color combinations are endless and a set of these would make a fun gift also!
To make this version, it takes a few extra minutes to sew some yo-yo's. It is an easy project and a perfect one for your child's first sewing project to work on ! She could make some for herself and her friends!
If you are not familiar with how to sew a yo-yo I'll show you how.
I tried a few different sized circles of fabric but liked the 3 1/2-4 inch circle best.
The tan & white hair clip above is a bit large and is a 4 inch circle, the orange and denim ones are a 3 1/2 inch circle.I like the 3 1/2 inch best. In the diagram below, I did it in a 3 inch circle and felt it was a bit too small, but may be perfect for a young childs hair.
Cut out a circle of fabric.
Thread a needle and knot one end.
Sew a running stitch (in/out in/out in a straight line)
around the edge of the circle:
When you've sewn all the way around the edge,
pull needle out of the thread. Gently start pulling on
the thread to gather the circle into the yo-yo shape.
Jan's tip: If your material has a right side & a wrong side,
when you start pulling the thread make sure it's gathering
with the right side out!
It should look like this when you pull it completely tight:
Tie a knot in the long thread as close to the gathered center of the yo-yo as you can.
Jan's tip: I like to wait to snip the thread till I have hot glued a button over the center, then snip the thread from under the button. I've snipped the knot off the thread before and had to resew the whole thing. ;The hot glue will help with that.
Hot glue button to center of the fabric yo-yo (this should cover the gathered center of the fabric). Layer buttons or felt shapes as desired and hot glue in place.
 |
| hotglue the center of the yo-yo to attach buttons. |
Hope you enjoy these little projects! I'd love to see some of your pictures if you do them, come post them on TipGarden's facebook page!


